


Hello, Hashnoders or learners,
I am back with the second blog about mastering react in 8 weeks and I hope you guys are learning a lot from my blogs.
Prerequisites
kindly install a code editor on your PC, I will recommend installing VS code i.e. visual studio code and I want you to practice on VScode.
How to install VS code
Go to the Visual Studio Code website (code.visualstudio.com) and click the "Download" button to download the latest version of VS Code.
Once the download is complete, double-click the downloaded installer file to start the installation process.
Follow the prompts to install VS Code. The installation process is straightforward and should only take a few minutes.
Once the installation is complete, you can launch VS Code by clicking the VS Code icon on your desktop or in the start menu.
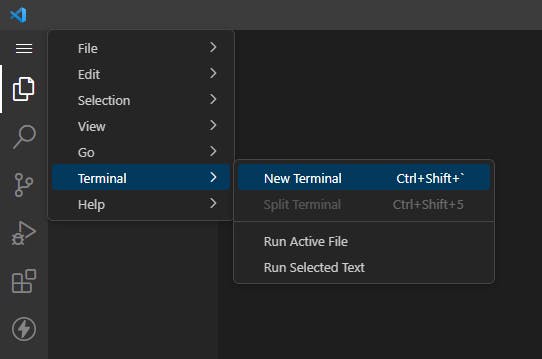
If you want to install additional extensions or add-ons for VS Code, you can open the VS Code Extension Marketplace by clicking the "Extensions" icon in the left-side menu, or by pressing Ctrl+Shift+X (Windows) or Cmd+Shift+X (Mac). From here, you can browse and install extensions to customize and extend the functionality of VS Code.
some important VS extensions that I will recommend are:-
Live Server - This extension allows you to quickly spin up a development server to test your web pages and applications. Simply right-click on an HTML file and select "Open with Live Server" to launch the server.
Prettier - This extension is a code formatter that helps you to automatically format your code according to a set of style rules. It can save you a lot of time and effort by automatically formatting your code as you type.
Bracket Pair Colorizer - This extension adds color coding to matching brackets, making it easier to see which brackets belong to which blocks of code.
Nodejs
To install Node.js, you will need to follow these steps:
Go to the Node.js website (nodejs.org) and click the "Download" button to download the latest version of Node.js.
Once the download is complete, double-click the downloaded installer file to start the installation process.
Follow the prompts to install Node.js. The installation process is straightforward and should only take a few minutes.
Once the installation is complete, you can verify that Node.js is installed by opening a terminal or command prompt and typing the following command:
node -v
This will print the version number of Node.js that is installed on your machine.
- To install npm (the Node.js package manager), simply run the following command in your terminal or command prompt:
npm install -g npm
This will install npm globally on your machine, which means that you will be able to use it from any directory.
Lets Install React
Now make a folder and open in your vs code and go to the terminal.
To install a React app, you will need to have Node.js and npm (the Node.js package manager) installed on your machine.
Once you have Node.js and npm installed, you can use the following steps to install a new React app:
Open a terminal and navigate to the directory where you want to create your new React app.
Run the following command to create a new React app:
npx create-react-app my-app
This will create a new directory called "my-app" with a basic React app setup.
you can name it anything.

It can take time to install react according to your internet speed and your PC specs.
- Navigate into the new project directory by running the following command:
cd my-app
- Start the development server by running the following command:
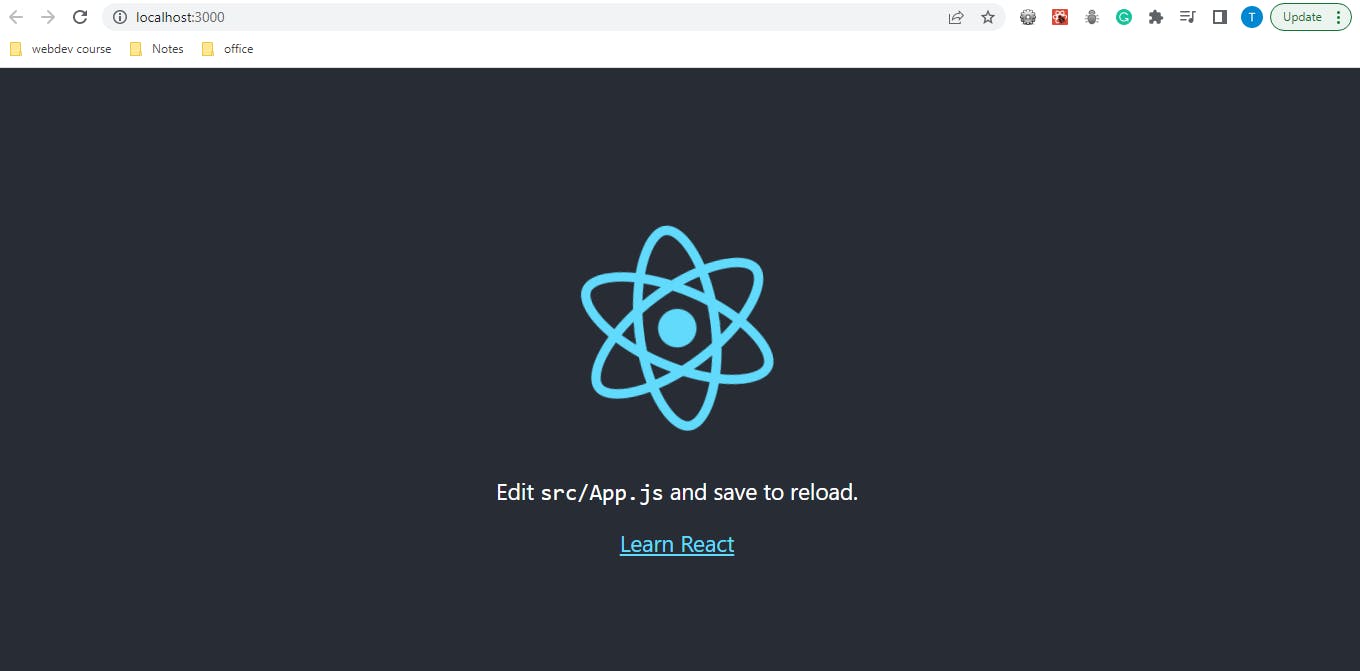
npm start
This will open a new browser window with your React app running.
I will recommend following my approach and do not install it globally reason being when you install it globally it is difficult to update the resource globally and moreover it can lead to version conflicts and other issues.
if you see the below window your react app has been installed perfectly,
Congratulations
Folder Structure in React
Below is the typical image of the folder structure that you will see after installing react app.
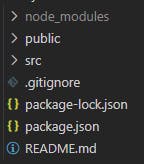
node_modules:- it contains all the dependencies of your project and typically it's a heavy folder so you should always mention the node_modules folder in your .gitignore file so that it can be ignored.
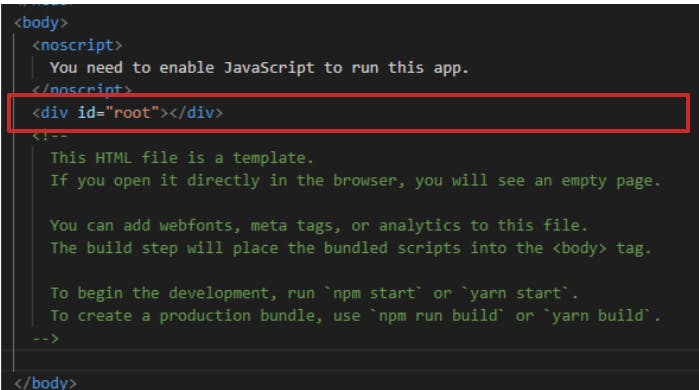
public folder:- this folder contains the HTML file that is used to render the app, sometimes it can contain favicon, images, logo, and so on. the most important file for us is index.html therefore do not modify this file.
index.html file contains the div which is the root element.
do not change anything in the body tag.
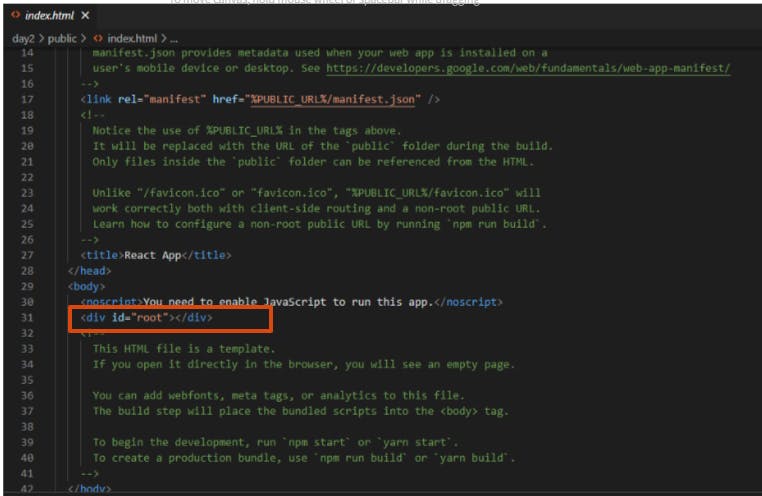
you will see a div with root as an id, basically root component will render all the UI of our application. we will understand how at a later stage in the article.
src folder:- It means source code therefore it will contain all the js files.
This is the folder where you will spend most of your time.
.gitignore:- it's basically a text file where you can write the location of the file that should be ignored such as node_modules.
# See https://help.github.com/articles/ignoring-files/ for more about ignoring files. # dependencies /node_modules /.pnp .pnp.js # testing /coverage # production /build # misc .DS_Store .env.local .env.development.local .env.test.local .env.production.local npm-debug.log* yarn-debug.log* yarn-error.log*package.json:- this is a file that contains all the dependencies of node.js and scripts. it is always present in the root directory of the file.
README.md:- it is a file that contains information about the project.
Wondering how this page is rendered? let's understand
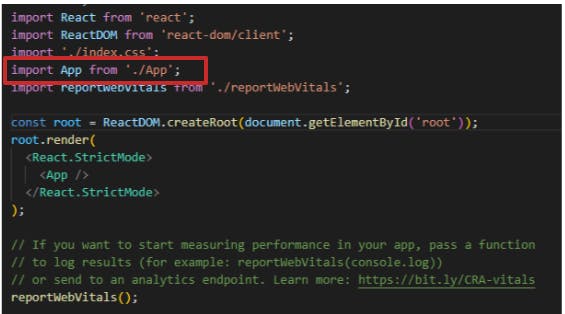
firstly, go to index.html file and there you will see a div with id root.
now let's head to the index.js file in the src folder, it will look like this
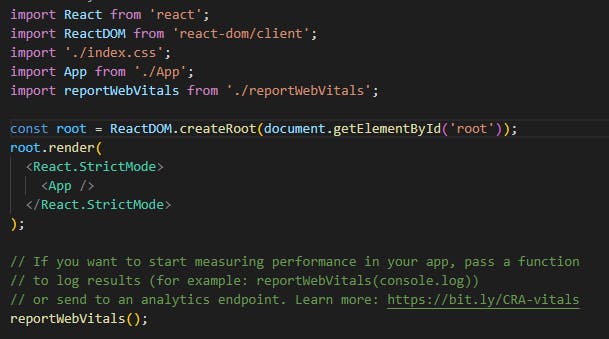
see the root variable and you will find some similarities:-
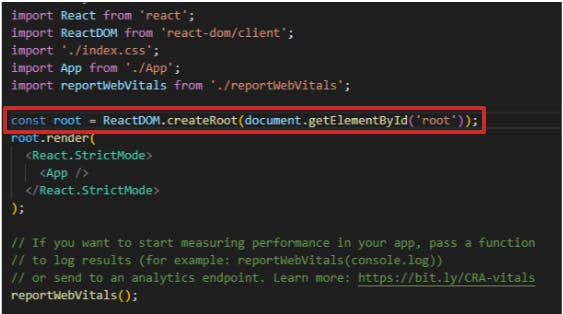
const root=ReactDOM.createRoot(document.getElementById('root'))you need to create a root element and then we will render it like this.
 root.render(
   <React.StrictMode>
     <App />
   </React.StrictMode>
 );
in root.render you can see two things, first is
React.StrictMode, and the second os<App />React.StrictModeis a component that is used to help identify potential problems in a React app. It is designed to trigger warnings in development mode to help developers find and fix problems that may cause bugs or performance issues.i will recommend removing it if you are starting up with React as it will show many possible errors, we will turn it on when we get a little familiar with the tools.
what is
<App />?This is how we run a function in React, whenever you are writing a function make sure you are naming it in PascalCase, not in camelCase.
but we have not declared the app function in our index.js file as we are importing it from another file.
let's go to the App.js file in the src folder.
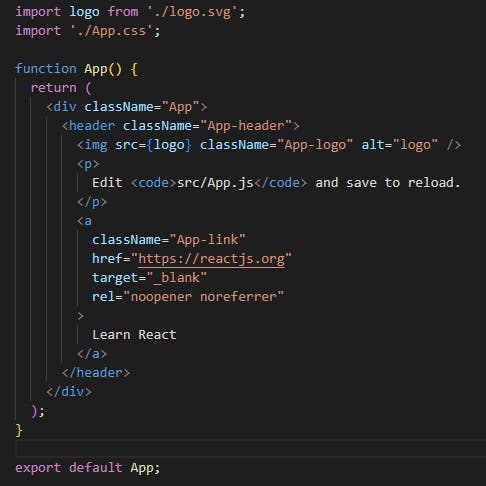
finally, we came to the function App which is responsible for rendering all the elements in our dom.
but how come we are writing HTML in a .js file?
is it possible?
This is where we will learn our new concept which is JSX(JavaScript XML).
What is JSX?
JSX (JavaScript XML) is a syntax extension for JS which allows us to write HTML-like code in JS.
It looks like HTML but it's not proper HTML.
We can write such code with the help of a transpiler that is babel.
let's understand the hard part first and then we will move to the easy part:-
In JS if we want to create an element we use the following code
/*
if you want to create an element like this:-
*/
<div class='container' style= 'color: red;' >
Hello, world!
</div>

//Normal Vanilla JS

let div =document.createElement('div');
div.classlist.add('container');
div.style.color='red'
div.textContent= 'Hello World!'


// React
//for reference
React.createElement(tagName, attributes in form of object, textContent or child element)

//code
let div = const element = React.createElement(
  'div',
  { className: 'container', style: { color: 'red' } },
  'Hello, world!'
);
This is the basic difference between creating an element in react vs creating an element with js but creating an element in react also has a drawback i.e.
what if we want to create an element like below ?
<div>
<h1>Hello World</h1>
<p>This is a paragraph</p>
</div>
we can create the following code in React like this
const element = React.createElement(
  'div',
  { className: 'container' },
  React.createElement('h1', null, 'Hello, world!'),
  React.createElement('p', null, 'This is a paragraph')
);

// or we can use an array for all the child element:-
const element = React.createElement(
  'div',
  { className: 'container' },
 [ React.createElement('h1', null, 'Hello, world!'),
  React.createElement('p', null, 'This is a paragraph')]
);
Activity time
go to the index.js folder
create the following element, using React.createElement(), and store it in the variable myCode.
 <div>
 <h1 style='color:red;' >your name</h1>
 <p>I am learning React </p>
 </div>
after you do this in root.Render instead of <App /> write this:-
 root.render(

     {myCode}

 );
meanwhile, remove the strict mode also and then save it, and refresh the localhost page. you will see something like this:-

one more thing we understood is that if we want to run JS in root.render then we will write it under a curly bracket like this {}.
we will look more into it in the blog ahead.
now let's understand how we can write the same code with JSX.
root.render(
<div>
<h1 style={{color:'red'}} >Nakul Goel</h1>
<p>I am learning React </p>
</div>
);
does it look super easy as compared to our above code?
let's break it.
//remeber for function we have to use PascalCase

const MyCode = ()=>{
  return(
  <div>
  <h1 style={{color:'red'}} >Nakul Goel</h1>
  <p>I am learning React </p>
  </div>
  )
  }

root.render(
<MyCode />
);

/* to call a function in React you will always call it like <name /> instead of name() */
now let's understand some rules of JSX:-
JSX elements must be properly nested. For example, you can't have a
divelement inside anh1element.JSX elements must be closed. For example, you must include the closing tag for a
divelement, like this:</div>.as we know image tag does not have a closing tag but in JSX we need to close it like this:-
<img src="" alt=""/>JSX elements can contain only one root element. For example, this is not allowed:
<h1>Hello, world!</h1><p>This is a paragraph</p>. Instead, you must wrap the elements in a container element, like this:<div><h1>Hello, world!</h1><p>This is a paragraph</p></div>.You must use camelCase for attribute names in JSX. For example, you should use
classNameinstead ofclass, andonClickinstead ofonclick.You must use curly braces to enclose JavaScript expressions in JSX. For example:
{2 + 2}.You must use quotes around attribute values in JSX unless the value is a JavaScript expression. For example:
<h1 className="title">Hello, world!</h1>.
I thought of ending the blog here but let's understand one more thing what is the use of Babel which is a transpiler for JSX?

in the above post, you can see the JSX is converted from JSX to React.createElement().
try it out yourself
go to https://babeljs.io/
Click on try it out.

then write your JSX and see hows it's converted.
now lets start the quiz.
Quiz
We will learn some parts in the next blog but still, it's worth searching for new things.
What is JSX?
a) A syntax extension for JavaScript that allows you to write HTML-like code in your JavaScript files.
b) A transpiler that converts JSX into regular JavaScript code.
c) A library for building web and mobile applications.
d) A virtual DOM (Document Object Model) element.
How do you create a JSX element that represents an
h1element with the text "Hello, world!"?a)
const element = <h1>Hello, world!</h1>;b)
const element = React.createElement('h1', null, 'Hello, world!');c)
const element = { type: 'h1', content: 'Hello, world!' };d)
const element = '<h1>Hello, world!</h1>';How do you pass an attribute to a JSX element?
a) By using camelCase and enclosing the attribute value in quotes.
b) By using hyphen-separated names and enclosing the attribute value in quotes.
c) By using camelCase and enclosing the attribute value in curly braces.
d) By using hyphen-separated names and enclosing the attribute value in curly braces.
How do you nest JSX elements?
a) By enclosing them in quotes.
b) By enclosing them in curly braces.
c) By enclosing them in parentheses.
d) By enclosing them in brackets.
How do you use a JavaScript expression in a JSX element?
a) By enclosing it in quotes.
b) By enclosing it in curly braces.
c) By enclosing it in parentheses.
d) By enclosing it in brackets.
How do you use conditional rendering in JSX?
a) By using
ifstatements.b) By using
switchstatements.c) By using ternary operators.
d) By using
forloops.How do you use loops in JSX?
a) By using
whileloops.b) By using
forloops.c) By using
mapfunctions.d) By using
reducefunctions.What is the purpose of the
keythe attribute in a JSX element?a) It specifies a unique identifier for the element.
b) It specifies the element's class name.
c) It specifies the element's style.
d) It specifies the element's content.
What is the purpose of the
ReactDOM.renderfunction?a) It renders a JSX element to the DOM (Document Object Model).
b) It transpires JSX into regular JavaScript code.
c) It creates a virtual DOM element.
d) It installs dependencies for a React application.
How do you use a React component in a JSX element?
a) By enclosing the component name in quotes.
b) By enclosing the component name in curly braces.
c) By enclosing the component name in parentheses.
d) By enclosing the component name in brackets.
For answers, you can attempt this quiz on google forms as well.
https://forms.gle/GsK4og3cnGMXJnrT9
this is it for today!!
we will meet in the next blog, keep learning.
if any one of you wants to work with me on this course please mail me at nakulgoyal78@gmail.com
This will help me release worksheets + quizzes for all of you faster.